Monday, January 30, 2012

Sometimes vanilla smells good

but sometimes it is nauseating sweet.  The latter would be the scent of vanilla I bought from Sweet Cakes.  I bought the variety of vanilla that is "most popular".  Apparently a lot of people like their vanilla very sweet.  Personally, I like my vanilla a little earthy and muted. 

Today I tried my own concoction of ingredients to make some lotion.  I used equal parts of coconut oil, beeswax, and olive oil.

 Mixed it up in my trusty pyrex and microwaved it.


I also added some vitamin E. 


All was turning out very well...  until I added my new vanilla fragrance.  I opened the bottle and took a whiff, and it was pretty strong so I didn't add very much.  But as I was stirring the lotion, the smell became more and more nauseating.  :( 


I'm not sure if I will be able to stomach using this batch of lotion.  And I am pretty sure I won't be using this particular scent of vanilla.  Anyone want a bottle of nauseatingly sweet vanilla fragrance?  Free for the taking.  Anyone... ?

In other news, I have a variety of projects to show you in the next few days that I have been working on  over the past week.  Here is a sneak peak:

Saturday, January 28, 2012

homemade chapstick

Sometimes you need/want to buy one or two items that can't be found in any nearby store and you have to buy it online.  Then the one or two items you need don't cost very much and the sites require that you order a minimum amount, say $25 worth of stuff.  Then you search their site for an hour trying to figure out what extra $10+ worth of stuff you think you might actually be able to use. Well, that happened twice last week. 

I ordered some oils from Mountain Rose Herbs and ended up with face lotion, broccoli sprouting seeds, and a sprouting screen.  Then I ordered some fragrances from Sweet Cakes to use in some future lotion recipes and I ended up buying some chapstick tubes as well.  Which aren't all bad purchases as I have been wanting to try them for a while anyway.

So, this morning I made chapstick using a recipe from one of my favorite blogs A Sonoma Garden.  It is thanks to this blog that I no longer feel like a complete weirdo for not using shampoo.  But that is a topic for another post!

I have made a few of her lotion recipes and have been wanting to try her chapstick recipe.  Last winter I made lip balm in little tubs, but I don't really like sticking my finger in it and smearing it all over my lips.  It's an OCD thing.  Again, topic for another post.

You can find her recipe here.  Surprisingly, I actually followed her recipe pretty closely. 

The recipe uses beeswax, cocoa butter, coconut oil, olive oil, and vitamin E.

All the ingredients except the vitamin E in my pyrex.  Then I microwaved mine until the beeswax melted.

Then added the vitamin E.

Poured the liquid into the chapstick tubes.

Here they are.  They turned out pretty nice.  I like how they kind of melt as they hit my lips.  I also like the slight scent of coconut.  As I was making them, I was thinking that I should have added some flavorings to my Sweet Cakes order.  I will probably find myself searching their site for $25 worth of stuff again soon!  Now I have enough tubes of chapstick to keep one in every room!

Friday, January 27, 2012

more rainbow cupcakes

Miss K really likes cupcakes and she really likes rainbows.  What girl doesn't?  She frequently asks me for color cupcakes!  Since we had people coming over for bible study I gave in and made her some "color cupcakes".

I used the same recipe I used for the rainbow cakes in a jar. I popped several of these myself before I remembered to take a picture.  (that certainly doesn't help the weight loss effort...)


Valentine Wreath

I guess it is time to take down the Christmas swag I made back in November.  I made it using the branches we cut off our Christmas tree.

I used cinnamon scented pine cones so everytime I opened the door it smelled like Christmas.  I'm sad to see it go, but it's almost February, so it's probably time.

Today I made a Valentine's day wreath to replace it.  I took forever!   I gleaned some inspiration from a few wreaths I saw on Pinterest here and here.

 I really wanted to do a heart shape but I only had a round foam wreath form I picked up at a garage sale.  I also had a few yards of some cream satin.  I don't even know what I was originally going to do with it, but it worked great for this project.


First off, I cut my strips of fabric.  And, no, I didn't measure the width.  I just used the ruler to cut a straight line.  I craft about the same way I follow a recipe...


 Then I folded and glued the strips of fabric into rose shapes.  Again, not following any real method.  Then I glued a thousand of them onto the wreath mold.  Well, maybe, not quite a thousand, but it took a lot more than I anticipated.
  

Here it is finished.  I'm not super excited about how it turned out, but I would say it was a success as I went through several sticks of hot glue and didn't burn myself even once!


Wednesday, January 25, 2012

Valentine's day is only three weeks away

and I have zero themed decorations.  Don't you have to decorate according to the holidays/seasons once you have kids?  Maybe not.  Anyway, today I finished up a small canvas I started yesterday.


I did use Pinterest as my inspiration, but not any one certain site.  So, I can't really point you to any specific tutorial.  I just looked at a few ideas then worked with what I had collecting dust in the basement.
Here is my arsenal:

Acrylic paint, crackle medium, mod podge, newpaper, and a small canvas.  I have an embarrassing number of these small square canvases that I need to use.  So expect to see several upcoming projects using them!  


Paint a layer of black paint.  Let dry.  Add crackle medium.  Let dry.  Add layer of blue paint.  Let dry.

Then you have something that looks a little like this.

Then I painted some newspaper red, cut out a heart shape and mod podeged it on the canvas.  (I can use mod podge as a verb right?)

I printed out the words I wanted, because I have the handwriting of a third grader.  I thought I would rub the ink off onto the canvas so I could draw over it, but I forgot to print the mirror image.  So I just mod podged them on there.  I kind of like the look of the paper on there anyway.  


Add to shelf with some felt roses and voila!  I have a smidgen of v-day decor.

Tuesday, January 24, 2012

I've never liked putting titles on things

I started several projects simultaneously.  Probably not a great idea, as I run the risk of never finishing any one project.  But I will be pushing to finish them up in the next couple of days.  I am working on a few Valentine's day projects.

I also started a batch of Nutty Butt Butter.  I like saying that. ;)  The recipe is here from Crunchy Betty.   I like making my own lotions and have recently made a few lotion bars which are working out really nice.   The only thing I don't like is holding the bar while rubbing it on.  My plan is to try making it in one of the Mr.'s old deodorant containers.  (yes, he still goes through these like a mad man, but at least he always smells nice.)  I was searching Pinterest for some new lotion recipes with I came across this:

They look lovely.  I love coffee and anything that smells like coffee, so these must be awesome.  AND she says that they are good for cellulite!  Win win in my book!  I started my infusing my oils with coffee yesterday.


So next week I will mix it up and see if it really does blast cellulite! 

I will post my valentine's day projects soon!

Sunday, January 22, 2012

Iced Coffee!

This morning I NEEDED coffee.  I only slept three hours last night because I drank a soda late (7pm...  haha).  I almost never drink soda, but it was a friend's birthday party so it was a special occasion. (I know. Staying up late and drinking soda!  I'm wild!)  I didn't think it would be enough caffeine to keep me up, but it sure did.

Needless to say, I was grumpy this morning and not looking forward to getting the kids ready for church.  Luckily, last night I had prepared my Pinterest project for today: Iced Coffee.  I LOVE iced coffee drinks!  So when I saw all the iced coffee drinks on pinterest I knew I had to try it for sure!

I followed this recipe and directions from the Pioneer Woman's website.  Haha, did I just say I followed a recipe?  I didn't actually follow the recipe.  I used it more like a guideline, like I do all recipes.  I told you I'm wild! 

Last night I dumped an unmeasured amount of old starbucks coffee in a bowl and poured an unmeasured amount of water into it and let it sit over night.  This morning I strained the water off through a cheesecloth.  

 
 I got a little impatient with my pouring and made a mess of the cheesecloth, so I had to strain it again.  Slowly this time...


  I felt like I had to use a mason jar too.  You know, 'cause they're cool.  
Did you know they make lids to turn your canning jars into travel mugs? 


Yep, saw it on Pinterest.  Doubt I would ever spend money on it, but looks cool!


Soy milk for my "cream".  I always order soy at Starbucks too. :)


You all should really try this one.  It was CRAZY delicious.  This was seriously just what my morning needed.  After just one gulp, my mood was suddenly cheerful and ready to calmly deal with my three year old's temper!  Not sure if it was due to the caffeine, or the awesome flavor.  I don't really care either way!  This may be my new obsession.  So long as I only drink it in the morning! 


Saturday, January 21, 2012

Braided Collar Nautical Dress

This week I needed a quick birthday gift idea for a little lady turning one this weekend, and of course I always feel like I have to make something.  So I started digging through my fabric and to be recycled clothes stash until I found a an blue and white striped shirt I had thrifted a few months ago.  I had bought it thinking I might wear it myself ( I have a thing for stripes), but it was unfortunately too short.  I always have that problem.  I often wonder if I may one of those rare people with an extra vertebra that makes my torso sooo much longer than everyone else.

Anyhoo, I decided I would try to do something with that top, and try to give it a nautical feel since the birthday girl and her parents are going on a cruise soon.  I had found a great fabric.  Now I needed a great design.   I ransacked my pattern stash and found nothing that fit the occasion, or the time I had to spend on this project.  So where did I turn for my inspiration?  Pinterest, of course!  I searched a few different ideas until I came across this dress tutorial by make it and love it.
 
 
 Cute, right?  The really great part is that I didn't even need a pattern.  I just cut the shape I wanted, added a few pockets and some little gold anchor buttons and voila!


A quick, easy, yet handmade birthday present!  Hope she loves it.  Miss K thought it was for her and wanted to keep it.  I guess I will have to hit up the thrift store again!

Friday, January 20, 2012

Update and Idea

Well, it's only been four months since I posted on here...  In my last post I had just started on my dress.  Sadly, the dress has gone no farther since that post.  You are probably thinking, "Wow, lady, at this rate that dress will be done just in time for your 50th wedding anniversary."  And you would be right. In my defense, I have done several other projects that took time away from that dress.  I still plan on finishing it.  The goal now is to get it done for my sister-in-law's wedding in August.  So, that gives me about 7 months.  I WILL get this done.  I have to.  I spent too much money on the fabric to just waste it!

I've been trying to come up with an idea to get me on here more, feed my need to craft, and not take too much time away from being with the kiddos.  While cruising around on Pinterest, a lovely place I frequent often, I had an idea!  I pin all kinds of things I would love to make someday, but I often wonder if I am  wasting a lot of cyberspace on projects that will never be done.  So, I decided I should find and complete one project inspired by my Pinterest pinnings a day!  An idea that is certain make for a lot more lovely crafternoons in the near future!  :D

I'm having to hold myself back from jumping in and doing several of them today!  For today's Pinterest project I have chosen, at the request on my three year old, to make rainbow cake in a jar.  They look so pretty and yummy!

So, here we go!  First off, all the recipes I've seen on Pinterest for these beauties contain eggs or milk, which my little lady can't eat.  So, I've used a vegan recipe that I frequently turn to for making cakes around here.  It always turns out perfect.

Vanilla Vegan Cupcakes (or cake) - adapted from Vegan Cupcakes Take Over the World
 
 Ingredients


1 cup soy milk

1 tsp. apple cider vinegar

cups all-purpose flour

2 Tbsp. cornstarch

¾ tsp. baking powder

½ tsp. baking soda

¼ tsp. salt 

½ cup vegetable oil

¾ cup sugar

2 tsp. vanilla extract


I mixed up all the dry ingredients first then added all the wet stuff.  Then I separated it into 6 different bowls and added my food coloring.  (It always bothers me that indigo gets left out of most rainbows, and yet I left it out too.  Sorry indigo!)
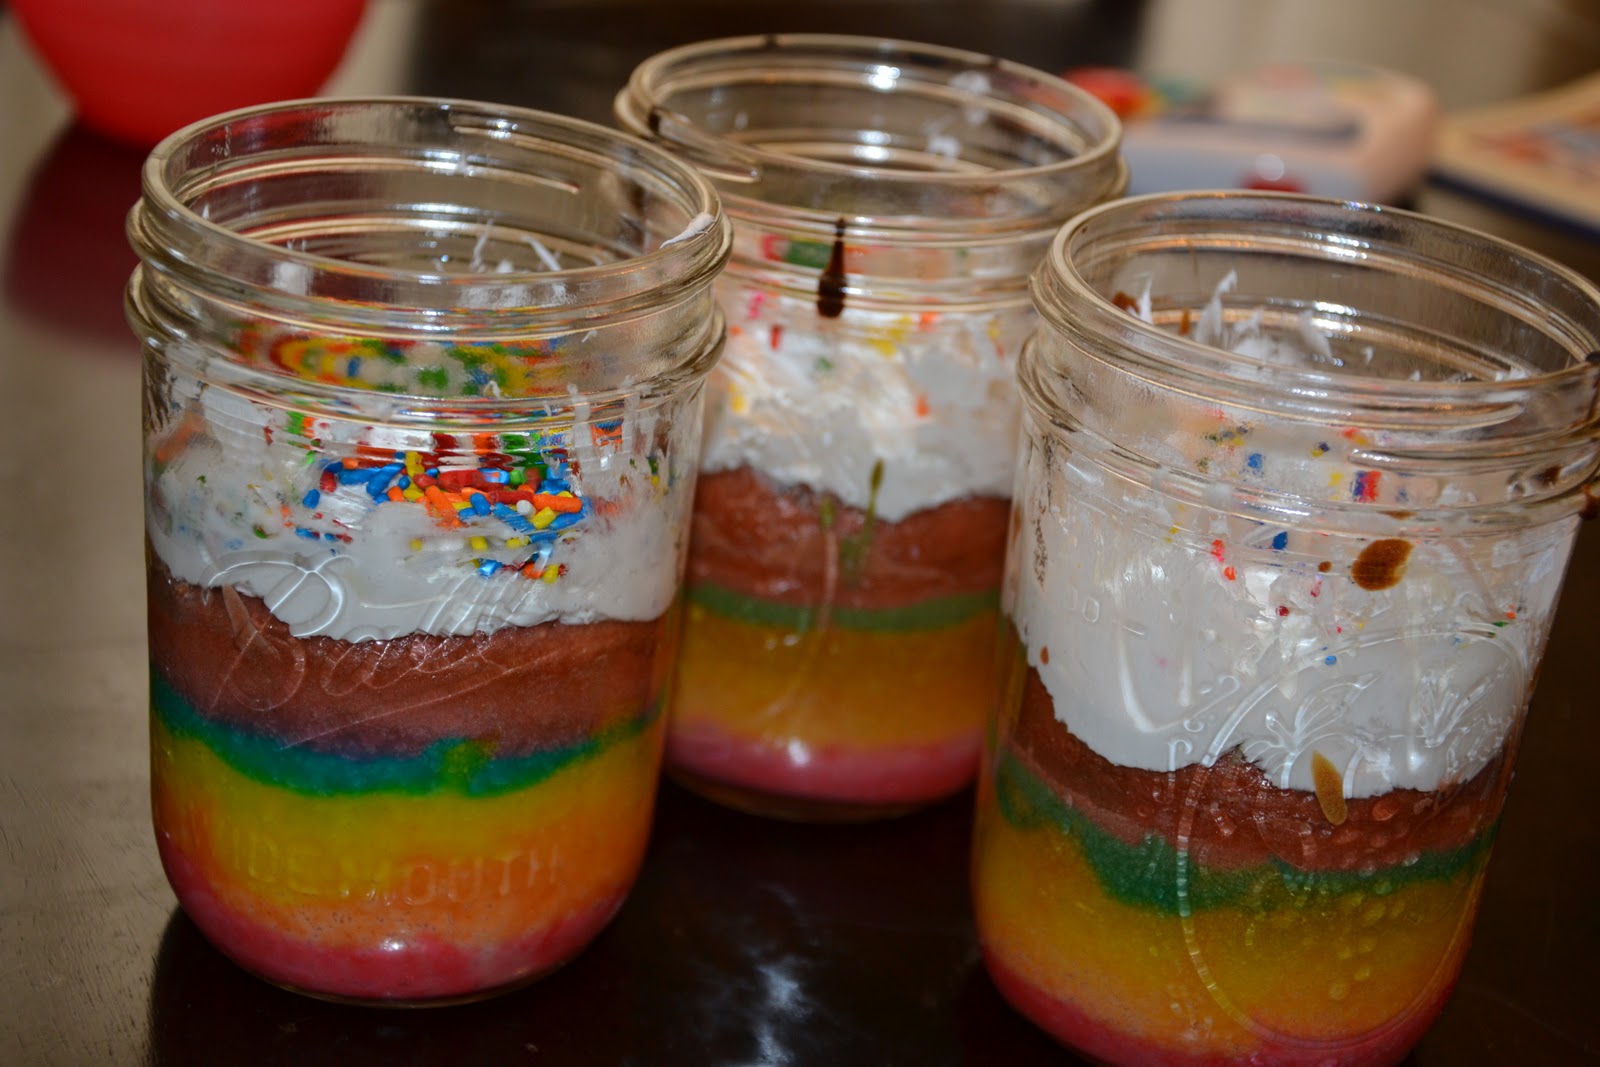
 Then I poured them into mason jars.  I put the jar in a dish of water and baked for 40 min at 375 degrees.


 The purple isn't quite as pretty as it was before it was baked.  My recipe didn't make very much, so if I make these again I will put them in smaller jars and probably double the recipe.

 Not quite as pretty as the ones I've seen on Pinterest, but just as yummy I'm sure.


Someone really likes sprinkles...

Well that is the first of, hopefully, many many Pinterest projects.  Coming soon are Braided Neck Nautical Dress, Nutty Butt Butter, and reusing an old deodorant container! 

See you soon!